Contents 

Welcome
Quick start
Quick start guide
Choosing an output type
Importing photos and video
Importing background Music
Organizing the menu
Authoring the disk
Authoring a video
User guide
How to Create, Open, and Save projects
Creating a new project file
Opening a project File
Saving a project File
Output type
Output aspect ratio
How to add photos and video to your slideshow
Importing images & video
Adding a blank slide
Rearranging slides
Removing slides
Setting the slideshow menu thumbnail (Optical output types only)
Slideshow settings
Slideshow settings
Disk chapter markers
How to edit and decorate a slide
Rotating a slide
Setting display length
Setting the transition effect between slides
Duplicating a slide
Editing a slide's input media
Adjusting an image's colors
Cropping an image
Orientaing a decoration
Adding an outline mask
Trimming a video
Changing the text on a template design
Slide tab options
Using a pre-design slide template
Setting the background
Decorating with text, images and video
Adding text
Editing the text font style
Adding images, video or clipart
Manually selecting a decoration
Setting the time region a decoration is shown for
Setting the exact position of a decoration
Setting the transparency of a decoration
Setting the exact rotation of a decoration
Additional decoration options
Adjusting the pan & zoom regions
Adding filters
Adding a border
Ordering the decoration layers
Adding a motion effect to a decoration
How to add background music
Importing music
Removing music
Rearranging the background music order
Making a music track end on a slide
Trimming a background music track
Synchronize slideshow to the background music
Advance audio options
How to add a narration to your slideshow
Recording a narration for your slideshow
Rearranging narrations
Adding a narration or sound from an audio file
How to preview a slideshow
Previewing a slideshow
How to organize the menu disk structure (Optical output types only)
The PhotoVidShow disk structure and editor
Creating a new slideshow album
Deleting a slideshow album
Moving a slideshow
Changing the menu title or slideshow thumbnail text
Creating a new sub menu
Importing a slideshow from another project
How to set a menu theme (Optical output types only)
Setting menu background image and music
Setting menu layout and button style
Setting menu duration
Adding further decorations and altering a menu
Setting navigation button style
Setting the disk highlight style
How to author your project
Encoding with motion blur
How to create a video from your slideshow
Creating a video from your slideshow
How to burn your project to DVD, Blu-ray or CD
Setting the output TV standard
Setting the Blu-ray resolution and fps
Reduce output to TV safe region
Ignoring menus
Including original material on the disk
Setting the disk image folder
Selecting a writer
Other editor options
Top tool bar options
Relinking project files
Undo and Redo
Un-installing
Contact

PhotoVidShow user manual

Prev Page Next Page

The PhotoVidShow disk menu structure and editor


This tab is only available when an 'optical'output is selected. To change the output type, select from the 'Output'option from the top tool bar to one the the following output types:- DVD, Blu-ray, SVCD or VCD.

If the Outputis set to 'Video', then only one slideshow can edited and all menu tab options are removed.


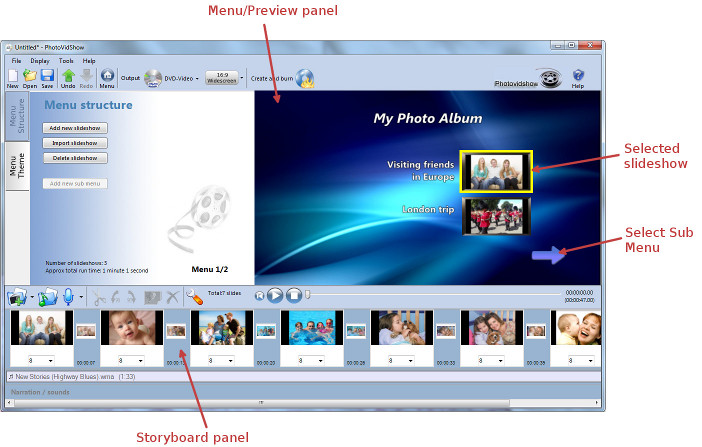
A PhotoVidShow authored disk is organised similar to how you would expect a normal DVD to be organised, i.e. containing menus and video titles. Once a PhotoVidShow authored disk is inserted and played in a normal DVD/Blu-ray player, it will bring up an initial menu. From the initial menu you can select any slideshow (title) for playing or select another sub menu. Once a slideshow has finished playing it will return to the menu it was initially selected from.

The PhotoVidShow editor will organise and display slideshows and menus identical to how the final disk would appear on TV. When you first bring up the editor, or if a new project is created, you are shown the initial menu on the right ā€˜menu panelā€™. PhotoVidShow will automatically create the first slideshow album for you. From here you can add photos to the current slideshow (in the bottom 'storyboard panel'), create further slideshow albums or create a sub menu. Navigation between sub and parent menus can be done by left clicking on the arrows in the 'menu panel'

The bottom ā€˜storyboardā€™ panel shows the slides in the currently selected menu slideshow (normally highlighted when multiple slideshows exist). To switch to another slideshow simply left click on a slideshow from the menu panel. The slides in the storyboard panel simply show (from left to right) the slides in the order they will be played in the slideshow.

Tip: If you want to author a DVD or Blu-ray without any menus, this can still be done. There is a setting at authoring time to do this. See Ignoring menus page.


Converted from CHM to HTML with chm2web Pro 2.85 (unicode)